
1) Broadcast
ESP32 advertises over Bluetooth (BLE) using Nordic UART service UUID 6e400002-b5a3-f393-e0a9-e50e24dcca9e.
Payments for machines
x402 is a payment protocol for HTTPS payments. This project enables x402 over Bluetooth (BLE) with tap to pay. The Arduino libraries let you accept USDC payments from mobile and web apps using Bluetooth (BLE). All code is open source.
Mobile app screenshot - available now
Arduino libraries and apps.
Install the X402 Arduino library on your ESP32. The device advertises payment info over Bluetooth (BLE). The mobile app or web app connects and sends a payment. The device verifies the payment using the x402 facilitator API.
ESP32 advertises over Bluetooth (BLE) using Nordic UART service UUID 6e400002-b5a3-f393-e0a9-e50e24dcca9e.
App scans for devices, connects via GATT, subscribes to TX characteristic for data transfer.
Device sends payment requirements JSON, app responds with signed transaction payload.
ESP32 sends payload to Coinbase facilitator API over WiFi, receives transaction hash confirmation.
X402-Aurdino: payment verification for ESP32. x4Pay-core: Bluetooth (BLE) server for ESP32. React Native mobile app and React web app connect and send payments.
ESP32 Basic Payment Verification
#include <WiFi.h>
#include "X402Aurdino.h"

const String network = "base-sepolia";
const String payTo = "0xa78eD39F695615315458Bb066ac9a5F28Dfd65FE";
const String maxAmountRequired = "1000000"; // 1 USDC in micro-units

void setup() {
  Serial.begin(115200);
  WiFi.begin("yourWiFi", "password");

  // Build payment requirements
  String requirements = buildDefaultPaymentRementsJson(
    network, payTo, maxAmountRequired,
    "https://logo.url", "Device description"
  );

  Serial.println("Payment Requirements:");
  Serial.println(requirements);
}

void loop() {
  // Handle incoming payment payloads and verify them
  if (Serial.available()) {
    String paymentJson = Serial.readString();

    // Create PaymentPayload object
    PaymentPayload payload(paymentJson);

    // Verify payment using x402 facilitator API
    bool isValid = verifyPayment(payload, requirements);

    if (isValid) {
      Serial.println("Payment verified successfully!");
      // Add your device logic here (e.g., activate relay)
    }
  }
}
Free tutorials to build crypto payment devices with ESP32. Complete code examples included.
Control relay pins to activate coffee machine when payment is received.
ESP32, 4-channel relay module, push buttons, LEDs
#include <WiFi.h>
#include "X402Aurdino.h"
#include "x4pay-core.h"

// WiFi credentials
const char* ssid = "YourWiFi";
const char* password = "YourPassword";

// Payment configuration
const String DEVICE_NAME = "Coffee Machine";
const String NETWORK = "base-sepolia";
const String PAY_TO = "0xYourAddress";
const String LOGO = "https://example.com/coffee-logo.jpg";
const String DESCRIPTION = "Fresh coffee payments";

// Coffee options and pins
const String coffeeOptions[] = {"Espresso", "Americano", "Latte", "Cappuccino"};
const int relayPins[] = {2, 4, 5, 18}; // GPIO pins for relays
const int statusLED = 19;

X402Ble* coffeeMachine;

// Dynamic pricing based on coffee type
String calculatePrice(const std::vector<String>& options, const String& context) {
  for (const auto& option : options) {
    if (option == "Latte" || option == "Cappuccino") {
      return "2000000"; // 2 USDC for specialty drinks
    }
  }
  return "1000000"; // 1 USDC for regular coffee
}

// Payment success callback
void onPaymentSuccess(const std::vector<String>& options, const String& context) {
  Serial.println("Payment received! Making coffee...");
  digitalWrite(statusLED, HIGH);

  // Activate appropriate relay based on selection
  for (const auto& option : options) {
    for (int i = 0; i < 4; i++) {
      if (option == coffeeOptions[i]) {
        digitalWrite(relayPins[i], HIGH);
        delay(5000); // Run for 5 seconds
        digitalWrite(relayPins[i], LOW);
        break;
      }
    }
  }

  digitalWrite(statusLED, LOW);
  Serial.println("Coffee ready!");
}

void setup() {
  Serial.begin(115200);

  // Initialize pins
  for (int i = 0; i < 4; i++) {
    pinMode(relayPins[i], OUTPUT);
    digitalWrite(relayPins[i], LOW);
  }
  pinMode(statusLED, OUTPUT);

  // Connect to WiFi
  WiFi.begin(ssid, password);
  while (WiFi.status() != WL_CONNECTED) {
    delay(1000);
    Serial.println("Connecting to WiFi...");
  }
  Serial.println("WiFi connected!");

  // Create payment device
  coffeeMachine = new X402Ble(DEVICE_NAME, "1000000", PAY_TO, NETWORK,
                              LOGO, DESCRIPTION, "");

  // Configure options and callbacks
  coffeeMachine->enableOptions(coffeeOptions, 4);
  coffeeMachine->setDynamicPriceCallback(calculatePrice);
  coffeeMachine->setOnPay(onPaymentSuccess);

  // Start BLE service
  coffeeMachine->begin();
  Serial.println("Coffee machine ready for payments!");
}

void loop() {
  // Check for completed payments
  if (coffeeMachine->getStatusAndReset()) {
    Serial.println("New payment processed");
  }
  delay(100);
}
Control servo motor lock when payment is received.
ESP32, servo motor, GPS module, status LEDs
#include <WiFi.h>
#include <ESP32Servo.h>
#include "X402Aurdino.h"
#include "x4pay-core.h"

// WiFi and payment setup
const char* ssid = "YourWiFi";
const char* password = "YourPassword";
const String DEVICE_NAME = "Bike Rental";
const String NETWORK = "base-sepolia";
const String PAY_TO = "0xYourAddress";

// Hardware pins
const int servoPin = 9;
const int lockLED = 2;
const int unlockLED = 4;

Servo lockServo;
X402Ble* bikeRental;
bool isUnlocked = false;
unsigned long unlockTime = 0;

// Rental periods (in minutes)
const String rentalOptions[] = {"15 min", "30 min", "60 min", "24 hours"};

String calculateRentalPrice(const std::vector<String>& options, const String& context) {
  for (const auto& option : options) {
    if (option == "15 min") return "1500000";  // $1.50
    if (option == "30 min") return "2500000";  // $2.50
    if (option == "60 min") return "4000000";  // $4.00
    if (option == "24 hours") return "15000000"; // $15.00
  }
  return "1500000"; // Default 15 min
}

void onRentalPayment(const std::vector<String>& options, const String& context) {
  Serial.println("Payment received! Unlocking bike...");

  // Unlock the bike
  lockServo.write(90); // Unlock position
  isUnlocked = true;
  unlockTime = millis();

  // Set unlock duration based on payment
  unsigned long duration = 15 * 60 * 1000; // Default 15 minutes
  for (const auto& option : options) {
    if (option == "30 min") duration = 30 * 60 * 1000;
    else if (option == "60 min") duration = 60 * 60 * 1000;
    else if (option == "24 hours") duration = 24 * 60 * 60 * 1000;
  }

  digitalWrite(unlockLED, HIGH);
  digitalWrite(lockLED, LOW);

  Serial.print("Bike unlocked for: ");
  Serial.println(options[0]);
}

void setup() {
  Serial.begin(115200);

  // Initialize hardware
  lockServo.attach(servoPin);
  lockServo.write(0); // Lock position
  pinMode(lockLED, OUTPUT);
  pinMode(unlockLED, OUTPUT);
  digitalWrite(lockLED, HIGH);
  digitalWrite(unlockLED, LOW);

  // Connect to WiFi
  WiFi.begin(ssid, password);
  while (WiFi.status() != WL_CONNECTED) {
    delay(1000);
    Serial.println("Connecting to WiFi...");
  }

  // Setup payment device
  bikeRental = new X402Ble(DEVICE_NAME, "1500000", PAY_TO, NETWORK,
                           "", "Bike rental by the hour", "");

  bikeRental->enableOptions(rentalOptions, 4);
  bikeRental->setDynamicPriceCallback(calculateRentalPrice);
  bikeRental->setOnPay(onRentalPayment);
  bikeRental->begin();

  Serial.println("Bike rental system ready!");
}

void loop() {
  // Check if rental time expired
  if (isUnlocked && (millis() - unlockTime > 15 * 60 * 1000)) {
    // Lock the bike again
    lockServo.write(0);
    isUnlocked = false;
    digitalWrite(lockLED, HIGH);
    digitalWrite(unlockLED, LOW);
    Serial.println("Rental expired. Bike locked.");
  }

  delay(1000);
}
Control servo motors to dispense products when payment is received.
ESP32, servo motors, IR sensors, LCD display
#include <WiFi.h>
#include <ESP32Servo.h>
#include <LiquidCrystal_I2C.h>
#include "X402Aurdino.h"
#include "x4pay-core.h"

// WiFi credentials
const char* ssid = "YourWiFi";
const char* password = "YourPassword";

// Payment configuration
const String DEVICE_NAME = "Snack Machine";
const String NETWORK = "base-sepolia";
const String PAY_TO = "0xYourAddress";

// Hardware setup
Servo dispenserServos[4];
LiquidCrystal_I2C lcd(0x27, 16, 2);
const int servoPins[] = {9, 10, 11, 12};
const int sensorPins[] = {2, 4, 5, 18};

// Product configuration
const String products[] = {"Chips", "Cookies", "Candy", "Nuts"};
const String prices[] = {"1000000", "1500000", "2000000", "2500000"}; // $1-2.50
int inventory[] = {10, 8, 12, 5}; // Stock levels

X402Ble* vendingMachine;

String getProductPrice(const std::vector<String>& options, const String& context) {
  for (const auto& option : options) {
    for (int i = 0; i < 4; i++) {
      if (option == products[i]) {
        return prices[i];
      }
    }
  }
  return "1000000"; // Default price
}

void dispenseProduct(const std::vector<String>& options, const String& context) {
  Serial.println("Payment confirmed! Dispensing product...");

  for (const auto& option : options) {
    for (int i = 0; i < 4; i++) {
      if (option == products[i] && inventory[i] > 0) {
        // Dispense product
        dispenserServos[i].write(90);
        delay(1000);
        dispenserServos[i].write(0);

        // Update inventory
        inventory[i]--;

        // Update display
        lcd.clear();
        lcd.setCursor(0, 0);
        lcd.print("Dispensing:");
        lcd.setCursor(0, 1);
        lcd.print(option);

        Serial.print("Dispensed: ");
        Serial.println(option);

        delay(3000);
        updateDisplay();
        return;
      }
    }
  }
}

void updateDisplay() {
  lcd.clear();
  lcd.setCursor(0, 0);
  lcd.print("Crypto Vending");
  lcd.setCursor(0, 1);
  lcd.print("Tap to pay");
}

void setup() {
  Serial.begin(115200);

  // Initialize LCD
  lcd.init();
  lcd.backlight();
  updateDisplay();

  // Initialize servos and sensors
  for (int i = 0; i < 4; i++) {
    dispenserServos[i].attach(servoPins[i]);
    dispenserServos[i].write(0);
    pinMode(sensorPins[i], INPUT);
  }

  // Connect to WiFi
  WiFi.begin(ssid, password);
  while (WiFi.status() != WL_CONNECTED) {
    delay(1000);
    Serial.println("Connecting to WiFi...");
  }

  // Setup vending machine
  vendingMachine = new X402Ble(DEVICE_NAME, "1000000", PAY_TO, NETWORK,
                               "", "Crypto snack vending", "");

  // Configure available products
  vendingMachine->enableOptions(products, 4);
  vendingMachine->setDynamicPriceCallback(getProductPrice);
  vendingMachine->setOnPay(dispenseProduct);
  vendingMachine->begin();

  Serial.println("Vending machine ready!");
}

void loop() {
  // Monitor inventory and update availability
  static unsigned long lastCheck = 0;
  if (millis() - lastCheck > 5000) { // Check every 5 seconds
    lastCheck = millis();

    // Update product options based on inventory
    std::vector<String> availableProducts;
    for (int i = 0; i < 4; i++) {
      if (inventory[i] > 0) {
        availableProducts.push_back(products[i]);
      }
    }

    // Log inventory status
    Serial.print("Inventory: ");
    for (int i = 0; i < 4; i++) {
      Serial.print(products[i]);
      Serial.print(":");
      Serial.print(inventory[i]);
      Serial.print(" ");
    }
    Serial.println();
  }

  delay(100);
}
Use ultrasonic sensor to detect cars and set parking time when payment is received.
ESP32, ultrasonic sensor, 7-segment display, buzzer
#include <WiFi.h>
#include "X402Aurdino.h"
#include "x4pay-core.h"

// WiFi and payment setup
const char* ssid = "YourWiFi";
const char* password = "YourPassword";
const String DEVICE_NAME = "Parking Meter";
const String NETWORK = "base-sepolia";
const String PAY_TO = "0xYourAddress";

// Hardware pins
const int trigPin = 5;
const int echoPin = 18;
const int buzzerPin = 19;
const int displayPins[] = {2, 4, 16, 17}; // For 7-segment display

// Parking configuration
const String timeOptions[] = {"30 min", "1 hour", "2 hours", "4 hours"};
unsigned long parkingEndTime = 0;
bool carDetected = false;

X402Ble* parkingMeter;

String calculateParkingFee(const std::vector<String>& options, const String& context) {
  for (const auto& option : options) {
    if (option == "30 min") return "500000";   // $0.50
    if (option == "1 hour") return "1000000";  // $1.00
    if (option == "2 hours") return "1800000"; // $1.80
    if (option == "4 hours") return "3000000"; // $3.00
  }
  return "1000000"; // Default 1 hour
}

void onParkingPayment(const std::vector<String>& options, const String& context) {
  Serial.println("Parking payment received!");

  // Calculate parking duration
  unsigned long duration = 60 * 60 * 1000; // Default 1 hour in milliseconds
  for (const auto& option : options) {
    if (option == "30 min") duration = 30 * 60 * 1000;
    else if (option == "2 hours") duration = 2 * 60 * 60 * 1000;
    else if (option == "4 hours") duration = 4 * 60 * 60 * 1000;
  }

  parkingEndTime = millis() + duration;

  // Confirmation beep
  digitalWrite(buzzerPin, HIGH);
  delay(200);
  digitalWrite(buzzerPin, LOW);

  Serial.print("Parking paid for: ");
  Serial.println(options[0]);
}

float measureDistance() {
  digitalWrite(trigPin, LOW);
  delayMicroseconds(2);
  digitalWrite(trigPin, HIGH);
  delayMicroseconds(10);
  digitalWrite(trigPin, LOW);

  long duration = pulseIn(echoPin, HIGH);
  float distance = duration * 0.034 / 2; // Convert to cm

  return distance;
}

void displayTime(int minutes) {
  // Simple 7-segment display function
  // You would implement actual display logic here
  Serial.print("Time remaining: ");
  Serial.print(minutes);
  Serial.println(" minutes");
}

void setup() {
  Serial.begin(115200);

  // Initialize pins
  pinMode(trigPin, OUTPUT);
  pinMode(echoPin, INPUT);
  pinMode(buzzerPin, OUTPUT);

  // Initialize display pins
  for (int i = 0; i < 4; i++) {
    pinMode(displayPins[i], OUTPUT);
  }

  // Connect to WiFi
  WiFi.begin(ssid, password);
  while (WiFi.status() != WL_CONNECTED) {
    delay(1000);
    Serial.println("Connecting to WiFi...");
  }

  // Setup parking meter
  parkingMeter = new X402Ble(DEVICE_NAME, "1000000", PAY_TO, NETWORK,
                             "", "Digital parking payments", "");

  parkingMeter->enableOptions(timeOptions, 4);
  parkingMeter->setDynamicPriceCallback(calculateParkingFee);
  parkingMeter->setOnPay(onParkingPayment);
  parkingMeter->begin();

  Serial.println("Parking meter ready!");
}

void loop() {
  // Check for car presence
  float distance = measureDistance();
  carDetected = (distance < 200); // Car detected if within 2 meters

  // Check parking time
  if (parkingEndTime > 0) {
    if (millis() > parkingEndTime) {
      // Parking expired
      if (carDetected) {
        // Sound alarm for overtime parking
        digitalWrite(buzzerPin, HIGH);
        delay(100);
        digitalWrite(buzzerPin, LOW);
        delay(900);
      } else {
        // Car left, reset timer
        parkingEndTime = 0;
        Serial.println("Car left. Meter reset.");
      }
    } else {
      // Display remaining time
      unsigned long remaining = parkingEndTime - millis();
      int minutesLeft = remaining / (60 * 1000);
      displayTime(minutesLeft);
    }
  }

  delay(1000);
}
Install X402 Arduino libraries on any Microcontroller (ESP32 tested), configure payment address, upload code to ESP32.
Step 1
Install X402-Aurdino and x4Pay-core in Arduino IDE.
Step 2
Set payment address and WiFi credentials, upload to ESP32.
Step 3
Device advertises over Bluetooth (BLE) and verifies payments.
x4pay uses Bluetooth (BLE) with Nordic UART service for device communication, ESP32 memory-optimized libraries, and x402 facilitator API for payment verification. Built with FreeRTOS multi-threading and supports multiple blockchain networks.
Nordic UART service with 150-byte MTU, 10m range, 2-6 second connection time
~45KB program memory, ~8KB RAM, optimized with FreeRTOS task management
x402 facilitator API, 2-10 second verification, supports 6+ blockchain networks
Python SDK layer
to expose existing x4Pay core microcontrollers to the
Internet.
Now
agents can pay to use hardware
globally, not just via Bluetooth.
Internet Bridge for x4Pay Hardware
Exposes existing ESP32 x4Pay devices to global internet via Python SDK running on Pi or any computer device
Agent-to-Hardware Payments
AI agents can now discover and pay for hardware services globally through HTTP/x402 protocol instead of local Bluetooth only
Zero Changes to C++ Libraries
Existing X402-Arduino and X402-BLE-Arduino libraries remain unchanged - Python layer handles internet connectivity
AI Agent
Discovers hardware via HTTP/x402
Python SDK (Pi/Computer)
Bridges internet to Bluetooth
ESP32 Hardware
Unchanged C++ libraries
Global Access
Internet connectivity
Agent Ready
AI can pay hardware
No Changes
C++ libs unchanged
x402 Ready
HTTP payment protocol
# Python SDK - Global Hardware Access Bridge
import asyncio
import bleak
from fastapi import FastAPI, HTTPException
from x402_client import X402Client, PaymentHeader
import uvicorn

# Global Hardware Bridge Configuration
app = FastAPI(title="x4Pay Hardware Bridge", version="1.0.0")
bridge = X402HardwareBridge()

class X402HardwareBridge:
    def __init__(self):
        self.connected_devices = {}
        self.device_registry = {}

    async def discover_hardware(self):
        """Discover x4Pay ESP32 devices via Bluetooth"""
        devices = await bleak.BleakScanner.discover(
            service_uuids=["6e400002-b5a3-f393-e0a9-e50e24dcca9e"]
        )

        for device in devices:
            if device.name and device.name.startswith("x402-"):
                await self.connect_device(device)

    async def connect_device(self, device):
        """Connect to ESP32 and get payment requirements"""
        try:
            client = bleak.BleakClient(device.address)
            await client.connect()

            # Get payment requirements from ESP32
            requirements = await self.get_payment_requirements(client)

            # Register device for global access
            device_id = device.name
            self.connected_devices[device_id] = client
            self.device_registry[device_id] = {
                "requirements": requirements,
                "status": "online",
                "location": await self.get_device_location(),
                "capabilities": await self.get_device_capabilities(client)
            }

            print(f"Connected to {device_id} - Now globally accessible")

        except Exception as e:
            print(f"Failed to connect to {device.name}: {e}")

# HTTP/x402 Endpoints for Global Agent Access
@app.get("/hardware/discover")
async def discover_hardware():
    """Endpoint for agents to discover available hardware"""
    return {
        "devices": bridge.device_registry,
        "count": len(bridge.device_registry),
        "protocol": "x402"
    }

@app.post("/hardware/{device_id}/payment")
async def process_payment(device_id: str, payment_data: dict):
    """Process x402 payment for specific hardware device"""

    if device_id not in bridge.connected_devices:
        raise HTTPException(404, f"Device {device_id} not found")

    try:
        # Validate x402 payment header
        x402_client = X402Client()
        payment_valid = await x402_client.verify_payment(payment_data)

        if not payment_valid:
            raise HTTPException(400, "Invalid x402 payment")

        # Forward payment to ESP32 via Bluetooth
        ble_client = bridge.connected_devices[device_id]
        result = await bridge.forward_payment_to_esp32(
            ble_client, payment_data
        )

        return {
            "status": "success",
            "transaction_hash": result.get("tx_hash"),
            "device_response": result.get("response"),
            "execution_time": result.get("execution_time")
        }

    except Exception as e:
        raise HTTPException(500, f"Payment processing failed: {e}")

@app.get("/hardware/{device_id}/status")
async def get_device_status(device_id: str):
    """Get real-time status of hardware device"""

    if device_id not in bridge.device_registry:
        raise HTTPException(404, f"Device {device_id} not found")

    # Get live status from ESP32
    ble_client = bridge.connected_devices[device_id]
    status = await bridge.get_live_device_status(ble_client)

    return {
        "device_id": device_id,
        "status": status,
        "last_payment": status.get("last_payment_time"),
        "uptime": status.get("uptime"),
        "available_services": status.get("services")
    }

# Bridge Service Methods
async def forward_payment_to_esp32(self, ble_client, payment_data):
    """Forward HTTP x402 payment to ESP32 via BLE"""

    # Convert HTTP payment to BLE format
    ble_payload = self.convert_http_to_ble_payload(payment_data)

    # Send to ESP32 RX characteristic
    rx_char_uuid = "6e400004-b5a3-f393-e0a9-e50e24dcca9e"
    await ble_client.write_gatt_char(rx_char_uuid, ble_payload)

    # Wait for ESP32 response
    response = await self.wait_for_esp32_response(ble_client)
    return response

# Start Bridge Server
if __name__ == "__main__":
    # Initialize hardware discovery
    asyncio.create_task(bridge.discover_hardware())

    # Start HTTP server for global agent access
    print("🚀 x4Pay Hardware Bridge starting...")
    print("📡 ESP32 devices now globally accessible via HTTP/x402")
    print("🤖 AI agents can discover and pay for hardware services")

    uvicorn.run(app, host="0.0.0.0", port=8402)
Autonomous electric vehicle charging with dynamic pricing based on grid demand, vehicle battery level, and charging speed requirements. Per-kWh micropayments with automatic session management.
Python SDK bridges expose ESP32 devices to global internet. Raspberry Pi, laptops, and computers run bridge software to make local hardware accessible to remote agents worldwide via x402.
AI agents discover and pay for physical services: 3D printing, CNC machining, robotic assembly, environmental monitoring, and industrial automation - all accessible through standard HTTP/x402 protocol.
A micropayment protocol using BLE Nordic UART service for device-to-mobile communication. Includes payment verification, settlement, and supports features like recurring payments and dynamic pricing.
Base (mainnet) and Base Sepolia for testing, plus Polygon, Avalanche, IoTeX, Sei, and Peaq networks. All with native USDC support.
Yes—device discovery, configuration, and payment signing are offline via BLE. The mobile app sends transactions offline Devices verify & settle payments via x4pay.org facilitator API.
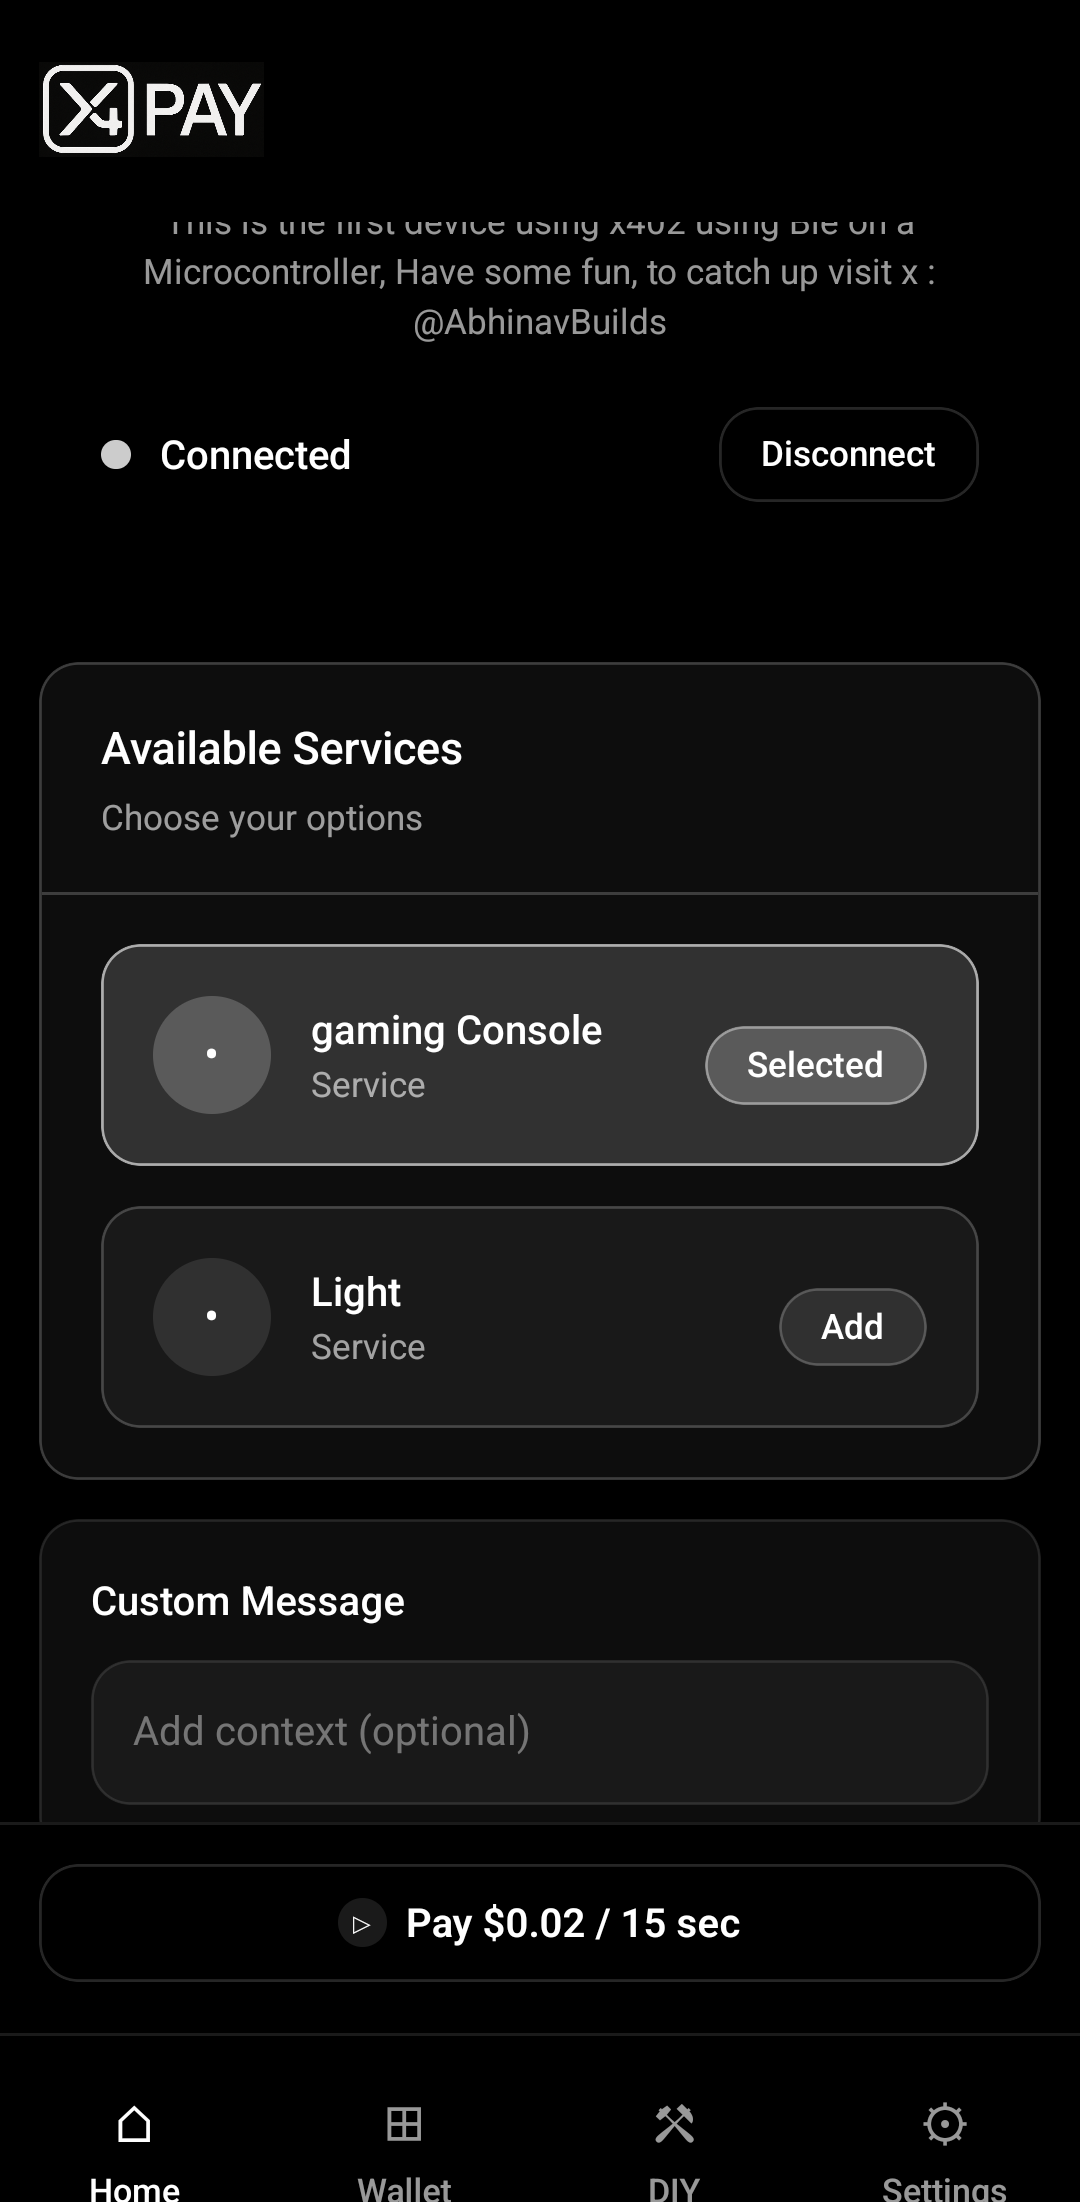
Recurring payments, dynamic pricing based on user selections, custom content/messages, multiple payment options per device, logo/banner/description display, and comprehensive memory management for embedded systems.
Uses PIN-based local encryption for private keys, supports multiple wallets, encrypted storage with AsyncStorage, and all signing happens locally on-device. No private keys are transmitted.
Chrome, Edge, and other Chromium-based browsers support Web Bluetooth API. The React web app uses RainbowKit for wallet connection and Wagmi for blockchain interactions, providing a seamless desktop experience.
Projects range from beginner (LED control) to advanced (motor control, safety systems). All use the same X402 payment libraries. Start with simple relay control projects like coffee machines before attempting complex systems like EV chargers.
Hardware costs range from $15-50. ESP32 boards cost ~$6, sensors and relays cost $5-15. The X402 Arduino libraries are free.
Yes. All ESP32 code examples and tutorials are free. Install the X402 Arduino libraries and copy the provided code.